Full Detailed Explanation of Brake Pad Machining Production Process
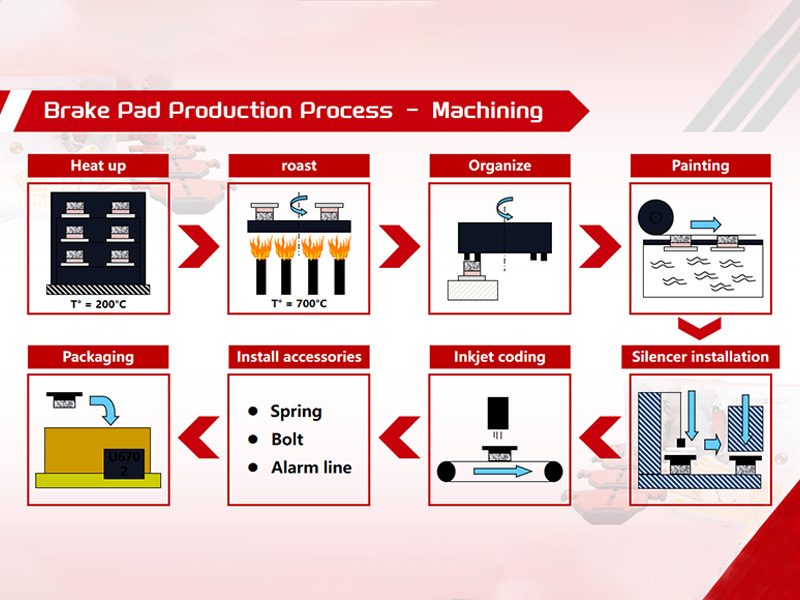
This diagram illustrates the complete post-forming machining workflow for finished brake pads, covering high-temperature thermal treatment, precision finishing, surface treatment, component assembly, coding and final packaging. Every stage is strictly controlled with standardized temperature parameters and operational specifications to guarantee stable product performance, anti-rust capacity and assembly compatibility. The full sequential production steps are elaborated as follows:
Step 1: Heat Up (Preheating Treatment, Standard Temperature: 200°C)
Freshly molded brake pad blanks are neatly stacked and placed into a constant-temperature preheating oven. The entire chamber is maintained at a stable 200°C. This low-temperature preheating serves multiple core purposes: eliminating residual internal moisture and tiny volatile impurities trapped inside the friction material and steel backing plate; relieving internal molding stress generated during previous pressing procedures to prevent warpage, cracking or deformation in the subsequent high-temperature roasting phase; and preheating the product evenly to ensure uniform heat absorption when entering the high-temperature furnace, which avoids uneven thermal expansion and inconsistent friction material density. Operators strictly control heating duration to make sure every batch of brake pads reaches a consistent preheating baseline temperature before moving forward.
Step 2: Roast (High-Temperature Curing & Calcination, Standard Temperature: 700°C)
After preheating, the brake pads are transferred to a high-temperature roasting furnace with a fixed operating temperature of 700°C. This is the most critical thermal treatment stage for stabilizing friction performance. Sustained intense heating fully cures all organic binders inside the friction block, thoroughly removing residual combustible substances and low-temperature volatile components. This process drastically upgrades the high-temperature resistance, friction stability and wear resistance of brake pads, effectively preventing brake fading, abnormal dust and overheated noise during vehicle braking. Rotary fixtures inside the furnace rotate continuously to ensure every surface of each brake pad receives balanced heating, eliminating local overheating or incomplete curing defects.
Step 3: Organize (Precision Finishing & Calibration Machining)
Once the high-temperature roasting is completed and the brake pads cool down to a safe handling temperature, they enter the precision organizing and finishing station. Automated rotating machining equipment trims and calibrates all dimensional tolerances of the brake pad, including the thickness of friction blocks, flatness of the steel back, edge chamfering and clearance matching surfaces. Excess overflow friction material formed during pressing and baking is polished away, and uneven contact surfaces are ground flat. This precision calibration ensures every brake pad meets unified dimensional standards, enabling seamless fitment with brake calipers during vehicle installation and eliminating jitter or poor contact during braking.
Step 4: Painting (Anti-Corrosion Coating Process)
All dimension-calibrated brake pads go through a full immersion painting procedure. The brake pads are fully submerged in specialized anti-rust protective paint liquid. The coating evenly covers the entire metal steel backing plate, forming a dense, waterproof and oxidation-resistant protective film. This layer of paint isolates the metal substrate from air, water vapor and road corrosive substances such as rainwater, mud and deicing salt, greatly extending the service life of brake pads and preventing rust spots from spreading to affect assembly and appearance. After dipping, excess paint drips off naturally, and the pads are air-dried to form a smooth, intact protective coating without paint sagging or missing coverage.
Step 5: Silencer installation (Noise Reduction Silencing Component Mounting)
After the paint coating is fully dried, workers or automated equipment install dedicated silencer shims onto the back of each brake pad. The diagram displays a sectional structure of the brake pad assembly: multi-layer damping silencer sheets are accurately attached between the steel back and brake caliper contact surface. These silencer components absorb vibration and eliminate metal-to-metal resonance during high-frequency braking, drastically cutting down harsh squealing, whistling and abnormal vibration noise. The installation follows fixed positioning standards to ensure each silencer sheet is fully bonded without tilting, peeling or partial detachment, delivering consistent noise-reduction effects for all finished products.
Step 6: Inkjet coding (Product Traceability Marking)
Fully assembled brake pads move along a conveyor belt to the automatic inkjet coding station. High-precision inkjet printers spray permanent identification codes directly onto the surface of each brake pad’s steel back. The printed information usually includes product model numbers, batch production codes, manufacturing dates, specification codes and unique traceability serial numbers. This coding system realizes full lifecycle traceability: clients can quickly check production batches, production dates and matching vehicle models via the printed codes, which simplifies inventory management, after-sales quality tracking and product classification for global distributors. The ink used is wear-resistant, high-temperature resistant and will not fade or blur under long-term driving heat and friction.
Step 7: Install accessories (Complete Auxiliary Fitting Assembly)
Following inkjet marking, all matching small auxiliary accessories are assembled onto the brake pad set. The standardized supporting parts include three core categories:
- Springs: Return springs and anti-rattle springs for caliper assembly, used to reset brake pads and eliminate loose vibration gaps;
- Bolts: Special fixing bolts for locking brake pad components during vehicle installation, with anti-loosening and anti-rust surface treatment;
- Alarm line: Wear sensor alarm wire, a safety accessory that triggers a warning sound when the friction block wears down to the safety limit, reminding car owners to replace brake pads in time and avoid metal-on-metal grinding damage to brake discs.
All accessories are installed in strict accordance with matching model standards, and each set is fully equipped without missing parts to support direct, convenient installation by downstream repair shops and vehicle factories.
Step 8: Packaging (Sealed Finished Product Packing)
The fully assembled brake pad sets with all matching accessories enter the final packaging station. Complete pad assemblies are placed into standardized color packaging boxes printed with product model information (such as the sample code U670-2 shown in the diagram). Each box contains a full set of brake pads and all matched mounting accessories, then the box is sealed for storage and shipment. Independent sealed packaging prevents dust, moisture and scratch damage during long-distance sea and land transportation, protects finished products from corrosion, and maintains neat product appearance for retail sales and warehouse circulation worldwide.
Full Sequential Process Summary
Heat Up (200°C Preheating) → Roast (700°C High-Temperature Curing) → Organize (Precision Dimensional Finishing) → Painting (Anti-Rust Dipping Coating) → Silencer installation (Vibration Noise Reduction Shim Mounting) → Inkjet coding (Traceability Information Marking) → Install accessories (Spring, Bolt & Wear Alarm Line Fitting) → Packaging (Finished Product Sealed Packing)


 admin
admin 

 Related




Excellent Service Each and Every Time